
Are you looking to build powerful PHP web applications but feeling overwhelmed by where to start? Well, I’ve got fantastic news for you! Codeigniter is absolutely the framework you need to master. I’ve been using it for years, and I can tell you firsthand that it’s one of the most beginner-friendly yet powerful PHP frameworks out there.
In this comprehensive tutorial, I’ll walk you through everything you need to know to start building amazing web applications with Codeigniter 4, the latest version as of now. No confusing jargon, just straightforward guidance that’ll have you coding like a pro in no time.
What Makes Codeigniter So Special?
Before we dive into the code, let me tell you why Codeigniter stands out from other PHP frameworks:
- Lightning Fast: Codeigniter is incredibly lightweight and performs much faster than most other frameworks.
- Easy Learning Curve: The documentation is superb, and the framework follows logical patterns that are easy to grasp.
- Zero Configuration: You can set up and start developing with minimal configuration.
- Built-in Security: The framework comes with powerful tools to protect your applications from common web attacks.
- Community Support: A massive community means you’ll never get stuck on a problem for long.
Trust me, once you start using Codeigniter, you’ll wonder how you ever developed without it!
Prerequisites
Before we begin, make sure you have:
- Basic knowledge of PHP (you should understand variables, functions, and object-oriented concepts. Explore our PHP Tutorials to level up your skill!)
- Understanding of the MVC design pattern (I’ll explain this more as we go)
- A local development environment (XAMPP, WAMP, or similar)
- PHP 8.1 or higher installed
- Composer installed (the PHP dependency manager)
Understanding MVC Architecture
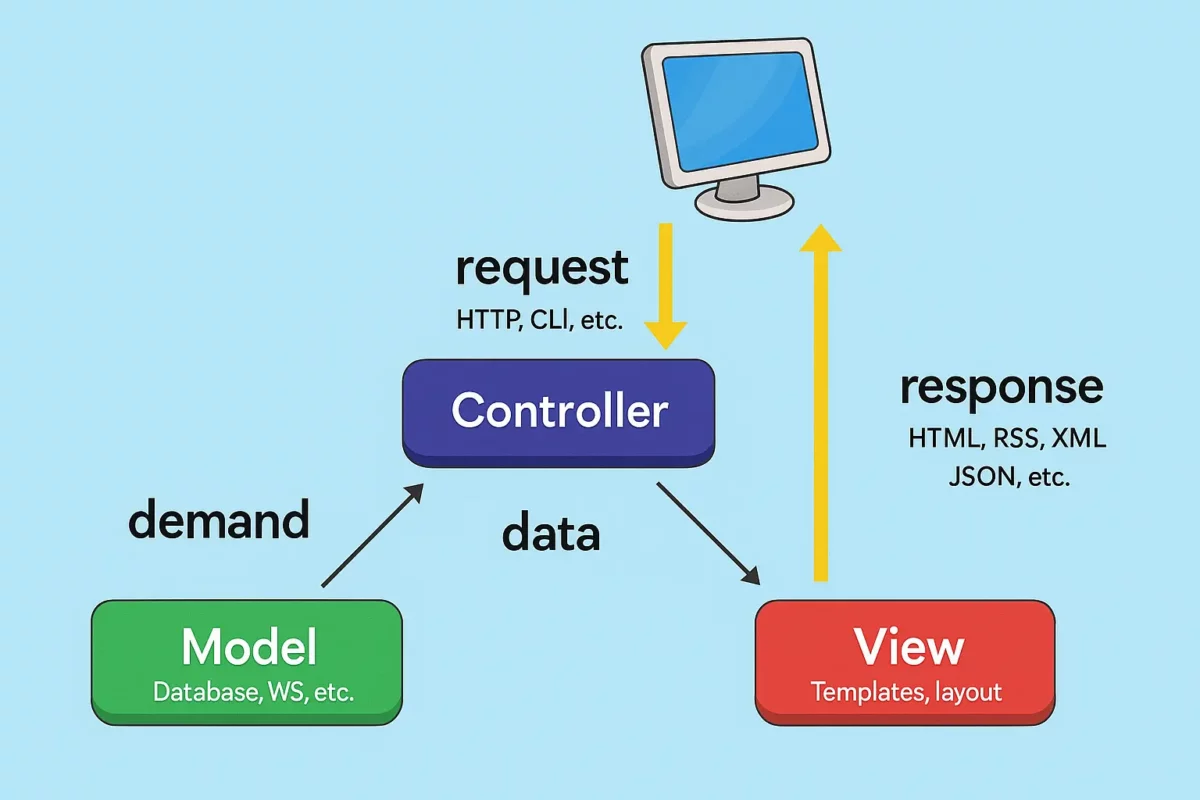
Codeigniter uses the Model-View-Controller (MVC) pattern, which separates your application into three interconnected components:
- Models: Handle your data and business logic
- Views: Display information to users
- Controllers: Process user requests and coordinate between models and views
This separation makes your code more organized, easier to maintain, and simpler to test. You’ll absolutely love how clean your codebase becomes!
Installing Codeigniter 4
Let’s get started by installing Codeigniter 4. There are two ways to do this:
Method 1: Using Composer (Recommended)
Open your terminal or command prompt and run:
composer create-project codeigniter4/appstarter my-projectThis creates a new Codeigniter project named “my-project” in the current directory.
Method 2: Manual Download
- Download the latest version from Codeigniter’s official website
- Extract the files to your web server’s root directory
- Rename the directory to your project name
I strongly recommend using the Composer method as it makes updating Codeigniter much easier in the future.
Directory Structure
After installation, you’ll see the following directory structure:
my-project/
├── app/
│   ├── Config/
│   ├── Controllers/
│   ├── Models/
│   ├── Views/
│   └── ...
├── public/
├── system/
├── writable/
├── tests/
└── vendor/Code language: PHP (php)
Let’s understand what each important directory does:
- app: This is where all YOUR code goes – controllers, models, views, config files, etc.
- public: The only directory that should be publicly accessible. Contains index.php and assets like CSS, JS, and images.
- system: Core framework files – NEVER modify these files directly!
- writable: Contains files that need write access (logs, cache, etc.)
- vendor: Contains third-party dependencies
Basic Configuration
Before we start building, let’s configure a few basics:
1. Environment Setup
Rename the env file to .env in your project root. Open it and set:
CI_ENVIRONMENT = developmentThis enables detailed error reporting during development.
2. Database Configuration
In the .env file, configure your database settings:
database.default.hostname = localhost
database.default.database = my_database
database.default.username = root
database.default.password = your_password
database.default.DBDriver = MySQLi